I eagerly awaited the February #Baketogether, hoping for a Valentine’s Day-appropriate recipe. I was thrilled when Abby announced that it was cheesecake. (As the group’s maven, she picks the subject and provides the basic recipe, along with tips and pictures.) #Baketogether encourages experimentation, so the basic recipe is only a guide.

My concept was single serving cheesecake tartlets – the dessert course of a romantic Valentine’s Day dinner for two. I made a couple of ingredient changes too. I went with lemon and crystallized ginger as the centerpiece flavors instead of vanilla, because that combination seemed a nice balance for the dense sweetness of a cheesecake. Plus, I changed the sour cream called for in Abby’s version to ricotta cheese, one of her suggested “swap-outs.”
If you’ve never had crystallized ginger, it’s a delicious tangy sweet made of thin slices of ginger boiled in simple syrup and rolled in sugar. I had some from a batch I made months ago, using David Leibovitz’s recipe, but you can buy it in many stores, including Trader Joe’s.
In a moment of total insanity, I decided to make homemade ricotta, using a Jennifer Perillo recipe that I’ve been yearning to try. That adventure, worthy of its own post, ended with beautiful ricotta and immense feelings of accomplishment and relief. But honestly, if I were a normal person just trying to make a nice dessert, I’d stick to store-bought and save the homemade ricotta for savoring on a piece of baguette, with jam from the farmers’ market.
My tartlet pans are 3¾” wide by ¾” deep. After I adjusted the 9” springform pan recipe to make ⅓ of the crust and filling, I discovered that I had crust for four, but filling for five, tartlets. My solution on-the-fly? I quickly improvised a fifth tartlet crust and charged ahead. If you don’t have tartlet forms and don’t want to buy them, you could make these mini cheesecakes in ramekins. In that case, however, you wouldn’t be able to unmold them. Of course, eating cheesecake straight from a ramekin wouldn’t exactly be hardship duty.
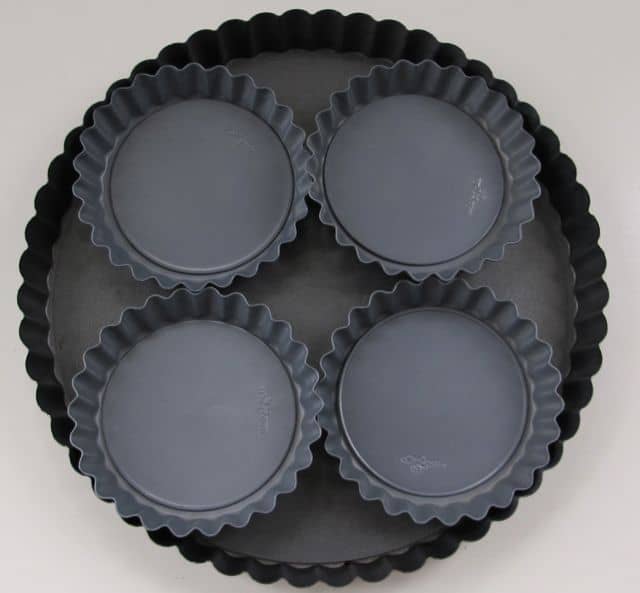
Four of my tartlet forms inside a 9″ tart pan.
Of course, four larger or higher tartlet forms would have accommodated all the filling. The modified recipe below should yield both crust and filling for five 3¾” tartlets: one to eat soon after they have cooled (just because you can’t resist), two for Valentine’s Day, and two to freeze for your next intimate dinner.
We tasted the tartlets last night and they were divine. I was slightly too enthusiastic when it came to beating the filling. Next time, I’ll heed Abby’s advice and go easy on that step. But the small crack or two on tartlet tops were aesthetic faults only as far as I could tell; the filling was still the right consistency – creamy and smooth. The lemon and ginger worked well and the ricotta probably lightened it up a bit.
This version is the polar opposite of my microwave mini cheesecakes; it has more steps and ingredients and I used homemade versions of both crystallized ginger and ricotta. But if you use store-bought ginger and ricotta, the #Baketogether version is actually quite easy to make. And as for tartlet pans – if you enjoy single serving desserts, I’d urge you to buy a couple. Besides, they are not expensive and are incredibly cute.
Lemon-Ginger Ricotta Cheesecake Tartlets
Five servings Total cost – $5.40 for 5 tartlets/$1.08 per tartlet
Ingredients
Crust
- 1¼ cups of finely crushed ginger cookies
- 2 tablespoons granulated sugar
- 3½ tablespoons of unsalted butter, melted
Filling
- 8 ounces of cream cheese (1 large package)
- 2 teaspoons all purpose flour
- Pinch of salt
- 3⅛ ounces of granulated sugar (I used sugar that had been stored with a vanilla bean in it, to give it a vanilla flavor. You don’t use the vanilla bean – just the sugar. You can use plain sugar or plain sugar plus ½ teaspoon of vanilla.)
- 1-2 tablespoons finely chopped crystallized ginger (I used 1 tablespoon and the taste was definitely there, but subtle. If you like ginger, add more.)
- 1 teaspoon grated lemon zest
- ¼ cup ricotta cheese
- 1½ eggs (I broke the second egg into a separate bowl, then spooned out half of it for the recipe.)
Equipment

- 4 tartlet pans
- Wax paper – to roll crumbs on
- Tin foil – to wrap tartlet pans in
- Plastic wrap – if you want to cover your hands when you form the crumb crust
- Cookie sheet – to put tartlet pans on while they bake
- Large bowl – to mix filling
- Electric hand mixer – Abby called for stand mixer, but when you have only ⅓ of the filling, the hand mixer works better in a smaller bowl.
- Spatula
- Cutting board
- Knife
- Grater – for lemon zest
- Measuring spoons
- Measuring cups (1 cup and ¼ cup) for crust and ricotta
- Fork
- Small scale (for sugar)
- Medium bowl for crust
- Small bowl for egg
Preparation
Follow Abby’s directions, except:
- put foil on outside of tartlet pans (instead of inside the larger springform pan) and you may prefer to use your bare fingers to put the moistened crumbs in the tartlet forms instead of covering your hands with plastic wrap,
- add the crystallized ginger, lemon zest, and ricotta (substituted for sour cream) after you beat the cream cheese until smooth, and
- bake at 300 for approximately 40 minutes (instead of approximately an hour.) Also, although you will need to refrigerate the tartlets before serving, they don’t take nearly as long to cool as the larger, springform cake.
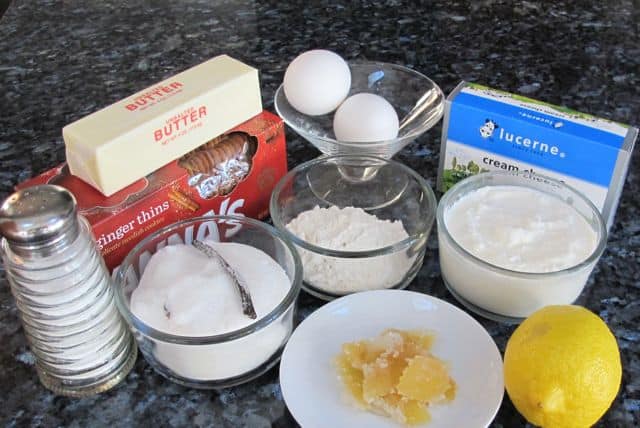
Here are a couple of pictures of my preparation, minus the expletive deleted moment when I realized that I didn’t have enough crust for all the tartlet filling.


Georgie says
Oooo, I bet the ginger compliments the cheescake perfectly – sounds delicious!
emily says
Hey there, this recipe was just what I needed! I’m baking *exactly* five tartlets for Thanksgiving DInner #1. I am also veganizing it with Kite Hill cream cheese and ricotta (almond-based) and arrowroot powder to sub for the egg. Plus my flavor combinations are orange zest in the cheese mixture, cocoa and nuts for the crust, and a blackberry-orange compote for the topping (plus cinnamon so you remember what time of year it is). Thanks for the inspiration!
Laura says
Emily, Delighted to have been your inspiration. Hope your dessert worked out beautifully and that you enjoyed the holiday.